
Finally. It's here. The post about the creation of Mr. Camel (and his secret passion for Sci Fi television).

When my sister-in-law Sarah first pinned this little camel on Pinterest, I was totally enamored.

Source: gallery.apartmenttherapy.com via Sarah on Pinterest
"Dude. We need this. It's a Camel. That babies can ride."
I thought having a rideable camel in the Five Camels household was the greatest idea EVER (and kind of hilarious). When she blogged about it? I just couldn't stand it anymore. Katherine NEEDED a giant camel in her nursery. End of story.
Upon closer examination of the camel in question, I decided that the design was simple enough that I could probably come up with a pattern for this little sucker on my own. I mean, this is a very basic stuffed dromedary camel. He doesn't even have legs!

Yup, I was pretty sure I could duplicate that adorable camel. Probably.
But first... I decided to check around online for possible free or reasonably priced stuffed camel patterns. I wasn't hopeful (I mean, how many people make giant stuffed camels anyways?!), but there's no harm in looking. You never know what you'll find!
Besides, patterns are always preferable to trying to wing it when it comes to projects like this. A legitimate sewing pattern could make the difference between an adorable camel & Frankenstein's pet vulture.
And that's when I stumbled across this on eBay... A GIANT VINTAGE CAMEL PATTERN?!?!?!

NO. FREAKING. WAY.
SERIOUSLY?!?!?!?!?!
Here's the product description from the seller:
This is a photocopy of a Vintage pattern to make a HUGE Stuffed Camel pattern. It measures between 35-40 inches long when complete. These patterns were called TV cushions or hassocks and little kids can sit on them while they watch television. I include a black and white copy of the instructions and the complete pattern, with ENLARGED instructions for easier reading.
This pattern was originally printed Jun 6, 1953. It was NOT copyrighted and became part of the public domain upon its publication Jun 6, 1953.
Omigod.Omigod.Omigod.I.have.to.make.this.
At this point, you are probably thinking that I'm a crazy nutcase (which is true), but you don't understand the magnitude of the awesomeness of this camel! This wouldn't just be an everyday giant stuffed camel (because, you know, giant stuffed camels are extremely common...), it would be a camel with history!
Cannot. Contain. Excitement.
Context is important here, so let's just take a moment and think about this. The pattern for this camel was printed in 1953 right at the height of TV's golden age. By 1953, 50% of Americans owned a television and the other 50% wanted to own a television. (source)
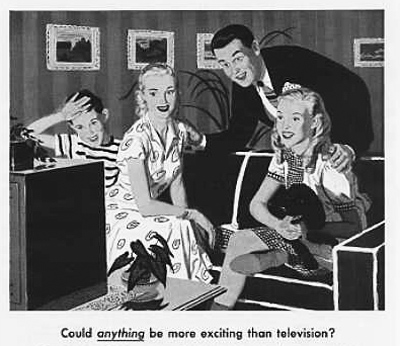
Television was marketed as a way to spend quality time together with the family - while perfectly dressed & groomed, of course. It was just the thing Mom & Dad needed to relax (cigarette in hand) at the end of the day.

In 1953 (the year of our camel), Swanson & Sons started marketing frozen "TV dinners" as a way for housewives to save time. No preparation, no dishes. Just pop that little aluminum dish into the oven and 25 minutes later, you and your family could eat dinner together in front of the television on your nifty foldable TV tray tables. (source)
Swanson TV Dinner commercial 1953

1956 credit
In 1953, Televisions were built to look a lot more like furniture than an electronic device and they were the crowning glory of every middle class American's home.

Housewives took good care of their furniture and the television set was no exception. They could even make sure that their TVs stayed toasty warm at all times with handmade television "scarfs". No joke.

1950 crochet pattern credit
Television ads depicted the picture perfect family with happily absorbed, well-behaved children.

IT&T, 1953 credit
Television companies promoted the "benefits" of TV for children throughout America. "TV can mean better behavior at home and better marks in school!" Just think of the possibilities! Quick, you'd better go out & buy one today!

Daily News, Sept. 1950 credit
Not only could parents rely on television to "strengthen family ties", but they could use TV as a bargaining chip to make their kids "get homework done--promptly!" and keep from acting up. Best of all? "Peace! Quiet! No more 'rainy day riots'... with television keeping small fry out of mischief... and out of mother's hair!"

Just look at how well-behaved those kids are! Sitting together peacefully glued to the tube while Dad enjoys the Sunday paper. Bliss, I tell you.
But... But... Those kids are on the floor! For shame!
What kind of wife & mother would you be if you let your child sit on the floor while watching TV??? At least get that kid a stool to sit on.

Or, even better, purchase one of these lovely TV floor chairs. Foldable for easy storage and everything!

But why buy something when you could make it yourself! Quick, honey! Take your vitamins and get to work! (after fixing your hair and putting on your pearls, of course...)

Because you know what's even better than some old stool or TV floor chair? You know what our kid needs?? A TV hassock. And not just any hassock... Oh no! Little Johnny needs the very best. You should make him a giant stuffed animal TV hassock. Wouldn't it be perfect if our little boy could watch his favorite TV western while sitting on a giant stuffed horse??
lHYjwB2k~$(KGrHqR,!h4Ev1+0EutFBMOJFQJP2g~~_1.JPG?set_id=8800005007)
Or how about a giant elephant, frog, lion, or turtle? No, wait, I've got it! A GIANT CAMEL!! That's right, honey! Use all that spare time you have during the day to make our little boy a giant camel to sit on while he watches TV!
Do you not see the hilarity in the camel TV hassock??? I do. And I also happen to know that my dear sister-in-law will. She loves mid-century stuff... fashion, furniture, etc. She gets a kick out of it. All of the above makes this camel extremely cool to her.
And who knew he'd turn out so gosh darn cute???
As soon as I found the vintage camel pattern, my determination (and paranoia) set in. I was going to make this thing and NO ONE, I mean NO ONE else would get baby Katherine a giant ride-able camel. Because. You know. That was likely... Whaaa?? (*rolls eyes at own ridiculousness*)
Paranoia paramount in my overheated, camel-focused brain, I sent Sarah the following email:
DON'T YOU DARE BUY A CAMEL FOR YOUR CHILD. DON'T LET ANYONE ELSE BUY A CAMEL FOR YOUR CHILD. DON'T EVEN LOOK AT A CAMEL FOR YOUR CHILD.
I'VE GOT THIS. I'M ALL OVER IT LIKE WHITE ON RICE. LIKE A DUCK ON A JUNE BUG. LIKE A DIAPER ON A BABY.
Ok? Okay.
Glad we got that out of the way.
xoxo,
Your Crazy Sister
P.S. Are you completely enamored with the exact camel design that you posted, or would you be down with an altered design as long as it looked like a camel?
To which Sarah promptly responded:
I solemnly swear I will not procure, nor will I allow anyone else to procure a camel for my child. That particular camel is of no importance. I just find the idea of a giant, rideable camel pretty much the most hysterical thing EVAH. I love you guys. You are hilarious.
O ye of little faith. She didn't think I'd actually do it. Ha. I showed her. I bought that damned pattern about two minutes after getting her response.
Now that we've firmly established that I'm a lunatic, on with the sewing!!
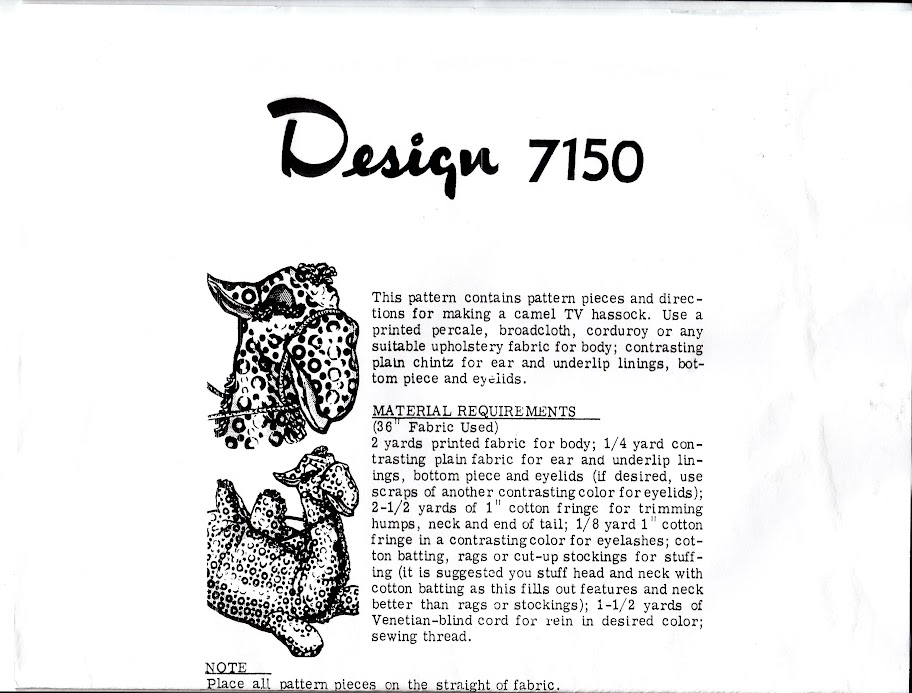
Design 7150 "contains pattern pieces and directions for making a camel TV hassock." Since the pattern isn't copyrighted, I took the liberty of scanning in the instructions and pattern for you. You know... just in case anyone else in the blogosphere gets the crazy urge to make a giant camel... For the most part, you'll want to follow the instructions and Google any crazy sewing terms you don't understand. For example, if you don't know what a dart is, particularly a diamond dart, then you'd better find out before making this thing!

When you cut out the paper pattern pieces, the camel head/neck will be in two pieces and the camel body will be in three pieces (but they overlap so much you only need two of the three pieces???). Just line up the dart points and lines and tape them together. When you lay out your pattern pieces on the folded fabric and begin cutting, pay attention to which pieces have to be on the fold! Otherwise, you'll only end up with half a camel body. Follow the cutting chart and the instructions written on each pattern piece. Also, be sure to mark all the darts & eye/neck/leg attachment areas on your fabric before you start sewing. You can use washable magic marker for this if a chalk pencil doesn't work on your fabric.

I took this picture after the camel was completed. I wanted to see if I had enough leftover fabric for a second camel... for when I get really, really bored one day... Or... Something. Fortunately, I don't. ;)
The pattern suggests that you use a printed upholstery type fabric for the camel body and plain fabric for the camel features. While I think this could turn out really cute, I actually switched the plain & printed fabrics around. I didn't want the camel to clash with baby Katherine's nursery and I didn't know (at the time) what fabrics would be used in the nursery. So, I decided to go with a natural looking camel. Originally, I was considering buying this "Soft Fur Solid Camel" fabric or possibly even a fabric made from actual camel hair fibers...

But then I reminded myself that I was being crazy and that the camel didn't have to look realistic because it's a children's toy. So I went to Walmart & bought a soft fleece fabric in, well, camel. I think the soft fleece makes the camel plenty snuggle-worthy.

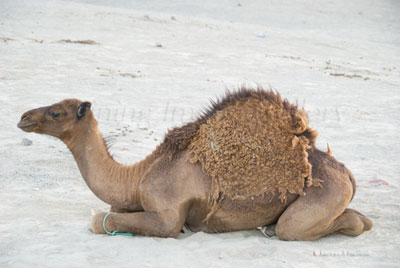
The vintage pattern will result in a bactrian (two-humped) camel. For those of you who haven't spent the last 2 months obsessed with camels, that means that you'll end up with an Asian camel originating in the Gobi Desert of Mongolia. If you wanted an Egyptian (North African/Middle Eastern) camel like the stuffed dromedary (one-humped) camel that served as inspiration for this whole project, then you'll want to modify the camel body pattern piece so that you end up with only one hump.
So instead of allowing the hump to dip back down before meeting the fold in the fabric, just continue cutting straight so that you have what looks like half of a large hump on the folded fabric. When you unfold it, you'll have one big camel hump.

Since most camels tuck their hind legs under them when they lie down (like in the above picture), the pattern only instructs you to cut out two front legs (so four individual pieces of fabric altogether). After attaching the two front legs to the body, I decided that the camel looked weird and incomplete--like maybe he was a handicapped camel in need of a hind leg wheel chair?

So I actually cut out two more legs (giving me a total of 8 individual leg pieces) and sewed them onto the back of the camel in the hopes that he'd look more like this:
Personally, I think he turned out much cuter for it.
Anyways, once you have cut out all of your pieces, you can machine sew all of the darts on the head/neck & body. Then you can machine sew the two body pieces together and the two head/neck pieces together. Make sure you line up your darts as you do this. Also, the instructions aren't clear about this, but the shorter end of the head inset points towards the camel's nose, while the longer end of the head inset points down his neck. It took me a while to figure that one out.

Warning: The head/neck pieces will look like a vulture before you stuff them. Don't freak out. It will all turn out okay. Even when your husband asks you why you are making a vulture, RELAX! When you stuff your head/neck piece... it will still look kind of like a vulture... RELAX. It will all turn out okay. The facial features are really what make it look like a camel.
I used polyester batting to stuff the head & half of the body. The lower half of the camel body is stuffed with cut up old towels to give it some weight and keep him from tipping over.

The legs, tail, ears, eyes, and mouth can also be partly machine sewn... but after that you are going to have to do A LOT of hand sewing. And I mean A LOT. You have to hand sew the bottom of the camel body shut on one side. You also have to hand sew the neck onto the body, the legs & tail onto the body, the mouth, eyelids, eye lashes, ears onto the face, and all of the fringe on the head, neck, body, and tail. Oh, and the reins. A LOT OF FRIGGING HAND SEWING. As in, you might want to purchase a thimble because your fingertips are really going to hurt. I hate working with thimbles, so I just worked on improving my sewing calluses. How people mass produce stuffed animals, I have no idea. Don't get me wrong, I had fun making this thing... My fingers just weren't on board with the whole "fun" deal. So, if you want to make this guy, be prepared!
The machine sewing actually takes very little time. But the hand sewing? I recommend that you find a new TV show with multiple seasons to watch during the making of this camel. I didn't actually keep track and my husband could probably give you a better idea of just how long I spent on this project, but I know I watched at least two whole seasons of Battlestar Gallactica while making this camel. At least. Sorry Katherine, but Mr. Camel is secretly a big Sci Fi fan. You might want to keep him away from anything to do with Star Wars. I'm pretty sure he'd go bananas over it.
Before I sewed everything in place, I moved all the features around until they looked right and then pinned them to secure them. I used a blind stitch for all of the hand sewing, so you actually can't see any of it. Did I know how to do this before the making of this camel? Nope. But that's what fabulous mothers are for, right? Thank for teaching me how to do a blind stitch, Mom!

Leaving the flat side of the ears, eyelids, and mouth open allowed me to shape and sculpt them to the camels head as I stitched. This was particularly important with the ears. I rounded them out and then pinched the inner part of the ear to make them look more realistic (and cute).

The patterned fabric that I used for the eyelids, inner ears, and mouth is actually a scrap of the same fabric that Sarah used to cover her nursery glider.

After seeing Sarah's cheerful (but discontinued) glider fabric on her blog, I asked her to send me a scrap piece of it for a "top secret project" that she wasn't allowed to ask questions about. She threatened to send me all of her leftover fabric, but I told her to hang onto it in case she found a better use for it in the nursery. Good thing too, since she ended up using the leftover fabric to make these fabulous teething rail guards for baby Katherine's crib:

I spent a long time in the Walmart sewing aisle hemming and hawing over materials for the reins, eye lashes & mane fringe while holding them up to a decapitated camel head. After a while, Joseph started saying, "Mama?! Mama?! MaMa?! MA.MA.?!!!!" and I had to make a decision or risk being escorted out by the Walmart police for being creepy and neglectful. The ribbon I used for the reins was the last of it's kind on clearance, so the reins are actually shorter than they are supposed to be... but it was just so cute, I had to buy it. I used tassels instead of fringe for the mane on the head, neck, and humps. I actually sewed on two layers of tassels because one row seemed too lopsided and bare.

None of the tassels in the above picture are actually sewn on yet. I was just trying to figure out where to put everything. I found that the easiest way to manage the tassels was to arrange it and then pin it all in place with a gazillion pins before sewing it.
The camel's tail, which also has a few layers of tassels at the end, is weighed down by a small rock on the inside. I don't think that this was completely necessary, but it was a rock that Joseph had been carrying around with him all day. He fell asleep clutching it under his chin, so I thought it might be sweet if he gave it to his new baby cousin.

That's a special rock, Katherine, so you'd better cherish it! ;)

The saddle is not a part of the camel pattern or design. It is entirely a result of my own crazy whim. Since the inspiration camel had an adorable camel blanket with giant pom pom fringe, I decided that Katherine's camel also needed something similar. And that it would all be done by machine because I was so done with hand sewing for a while.

Problem was, I couldn't figure out how to put a camel blanket on a two-humped camel. Fortunately, when I get stuck on a project, I just have to turn to Google Images. And my Mom.
If I went with a camel blanket, then I'd have to make something like this:

Kind of funky. Also, it would use a lot of fabric & require more pom pom fringe than I had.
Or, I could somehow make my own version of a bactrian camel saddle:

How? No idea. So, I gathered up my materials - the completed camel, leftover fabric from the same turquoise sheet that had already been used in my kitchen pantry curtain and baby Katherine's rainbow quilt, the rest of the glider fabric that Sarah had sent to me, and giant white pom pom trim (to match her crib skirt & nursery curtains) - and did what any grown woman in my place would have done. I took it all to my Mom's house and said, "HELP!"
Between the two of us, we came up with a design for the camel saddle. My Mom made the suggestion that the saddle be quilted like an actual camel saddle (which I loved) and is responsible for coming up with how I should incorporate the glider fabric into the design. I left her house feeling way more confident that I could pull this off. Thanks, Mom!

I cut out two pieces of the turquoise flat sheet shaped like a fat butterfly bandaid. Then I cut out the individual circles from the glider fabric.

With the two large circles, I cut slits all around the edge and ironed them under like so:

Then I sewed them onto the center of each side of the saddle. It still looked a little rough, so I sewed a thin white ribbon around the edge of the circle to make it look finished.

I took the two smaller circles and cut them in half. Then I sandwiched them together with some quilt batting, sewed around the outer curved edge, and turned them right side out.

They make up the front and back of the saddle seat.

I used a variety of specialty stitches on my machine to quilt the circles on the saddle.

For the quilting, I cut another bandaid shaped piece from the leftover camel fleece fabric.

I placed the quilted top of the saddle over the fleece.

Then I determined where everything would go. I wanted the saddle to be removable for cleaning purposes, so I had to measure & pin ribbons with velcro on the end to either side of the saddle before sewing it all together.

With the fleece still pinned to the back, I pinned the velcro ribbons & half circle seat bumpers to the front of the top saddle piece (going inwards toward the center of the saddle) and then I placed the second plain turquoise saddle piece over top of it. I sewed all around the edge leaving an opening on one end. So, I sewed it together inside out and then turned it right side out. This gave the saddle a nice finished edge with the ribbons & saddle bumpers neatly sewn in place. I tucked in the open part of the saddle and top-stitched over everything with pom pom trim around the edge.

It was too cute. Smaller pom pom fringe might have worked better up by the saddle seat, but I wasn't about to change it. Hopefully that wasn't too confusing. It's kind of hard to put into words and I was not being good about taking in progress sewing pictures during this whole project.
So, with all the sewing done, there was only one thing left to do... Allow small child to test out giant camel.

Joseph totally approved. There was lots of enthusiastic bouncing to race horse music. And the camel didn't even fall apart!
The camel was finished. His adorable, removable saddle was finished. Then I thought... Hmm. I wonder if I could somehow rig up some stirrups for the saddle.
ENOUGH. Caroline you are DONE. Obsession time is over. It's a children's toy. No more working on the camel.
Okay. Maybe I embroidered a little message on the underside of the saddle.

In my defense, we were driving home from the baby shower and I was stuck in the back of the van and very bored. ;)
So, if you are feeling a bit crazy and you get the urge to make the cutest giant camel in the entire world and can spare about 30 hours of your free time... be my guest.

I think I'm done for a while.

Probably. Joseph just might need a giant vintage lion for his birthday next year.
Was it worth it? HELL YES. Absolutely. Just look at the smile on this glowy pregnant lady's face at her baby shower:

Originally, I was going to have the camel be the centerpiece for the whole gift table at the baby shower. He was just so cute and he was responsible for delivering baby Katherine's rainbow quilt.

Then we started setting up the shower and I realized that I could miss getting Sarah's look of shocked hilarity on camera. And I wanted that look on camera. So I hid Mr. Camel in the back room.

I'm so glad I did. I think he was the perfect finale to all the present opening. When I explained to Sarah that the camel was actually made from a vintage pattern for a 1953 children's TV hassock, Sarah just looked at me in total bewilderment and said, "That's a thing?!?!"
Then Joseph wanted in on the camel action.

He's still convinced it's his camel.

That's okay. He can ride Mr. Camel every time we visit baby Katherine. :)


Have I mentioned that I got really excited about getting to be an aunt??? ;)
I.
ReplyDeleteLOVE.
YOU.
So.
So.
SO
Much!
I can't believe you did all this for baby Katherine. She is one spoiled little baby.
THANK YOU THANK YOU THANK YOU!!!!! :):):)
You are one crazy talented woman! I absolutely love this! Sarah is lucky to have such an awesome sister-in-law!
ReplyDeleteI, my auntie, and my mother are all deeply impressed with this.
ReplyDeleteA better camel could not have bern found in all the land.
OMG! I love that you made this. I am currently looking at THAT pattern as an addition to my crazy insane bellydance life. (I'm a bellydance instructor and my troupe does parades and events and other whatnot.) I've been searching for an affordable LARGE stuffed camel and I think this is the one.
ReplyDeleteTHANK YOU so much for posting Mr. Camel's journey from start to finish. It gives me an excellent idea of size and work involved.
That is a thing of beauty. I was just searching online for tv hassocks because my brother had a legless horse (store-bought) back in the late 60s and I was hoping to find a picture of one. Which, no, so far. But you have consoled me.
ReplyDeleteThat is a thing of beauty. I was just searching online for tv hassocks because my brother had a legless horse (store-bought) back in the late 60s and I was hoping to find a picture of one. Which, no, so far. But you have consoled me.
ReplyDeleteThis is marvelous! I had seen the exact same dromedary cushion picture on Pinterest, and was so saddened by the lack of info on how to make one - so thrilled and giddy with excitement with your tutorial and sharing of this pattern! THANK YOU!
ReplyDeleteHi, just to say thank you for sharing this pattern. I would like to share with you the camel that I've made for my baby boy on his 1st birthday. Have a look at https://www.facebook.com/photo.php?fbid=10151799537158324&set=a.394087008323.180790.244521833323&type=1&theater
ReplyDeleteHope you like it!