
I'm in the process of finally decorating our downstairs bathroom (formerly known as the Silence of the Lambs bathroom). Once I'm finished, I'll share all the gory details and provide you with some seriously scary before shots and some *hopefully* pretty after shots.
But for now... Let's just bask in the glory that is the $1 ruffled shower curtain, mmmkay?

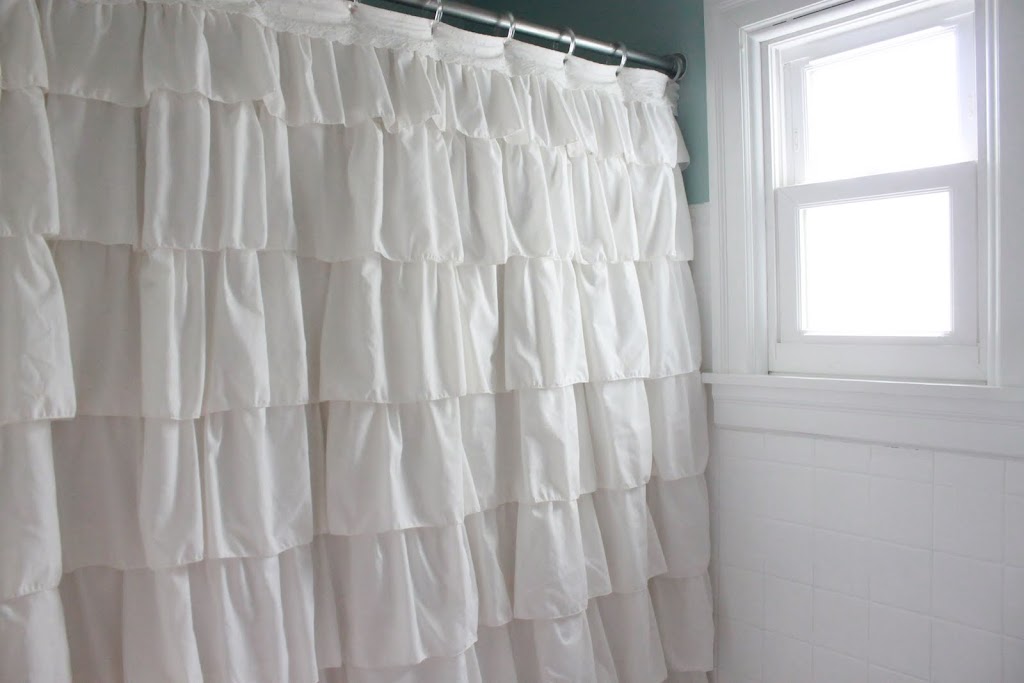
Hello, pretty! Welcome to your new home. Sit back. Relax. Feel free to stay awhile.
*enamored sigh*
I've had this shower curtain on the brain since August when I lost my mind and came up with a crazy plan to make the downstairs bathroom passably tolerable and went on a painting spree:

It's only $79 at Urban Outfitters. Only.
Of course, I am also very fond of this Anthropologie shower curtain:

It's only $118. Only. Sheesh. Are people insane?!? Who pays more than $25-$40 for a shower curtain, anyways? I realize I'm cheap, but come on.
I decided to make a hybrid of the two shower curtains in an effort to hide the monstrosity of a pink bathtub in my downstairs bathroom.
How hard could it possibly be? It's essentially a giant square with rows of ruffles on it. Very, very basic.
Also a major pain in the patootie, but doable nonetheless.
I bought a very large piece of white cotton sheeting from the Catholic thrift store for $1. It had stains all over it, but no one would ever see them, so whatever. I scrounged through my dresser of excess bed linens and came up with a relatively spotless white queen sized flat sheet with a eyelet ruffle along one end. I tossed both into the washer with some bleach and gave them a quick spin. For those of you who don't have excess bed linens from their father's house, I recommend haunting thrift stores & yard sales!

I cut the flat sheet into 9 inch strips using a cut up cereal box as a guide. It saved me from constantly pulling out the ruler. I got 10 strips in all, though the final strip was more like 7 inches wide. That's ok, I just put it at the top of the curtain.

I sewed along one edge of each strip with a zig zag stitch to keep it from fraying. As I wanted ruffles, all of the strips were longer then the backing sheet. I also made sure my backing sheet was wider than the shower curtain rod so that I could gather it later.

I gathered them and pinned them to the sheet 7 inches apart from each other. That way, there was over an inch of overlap with each ruffle. Then I used a straight stitch to sew the ruffles in place, hand ruffling as I went. This was incredibly tedious and took FOR. EV. ER. Please picture Squints from the Sandlot in your mind while reading FOR. EV. ER.

Note: This one ruffle is the narrower top ruffle and thus was less than 7 inches away from the next ruffle.
Thank goodness for husbands who force their wives to catch up on Battlestar Gallactica episodes. I've never wanted to go out and buy a ruffle foot for my sewing machine so much in my life. But that would involve leaving the house and spending money. *Shudders* Who does that?

Finally, after sewing all 10 rows of ruffles on, I took the strip of eyelet ruffle from the original bed sheet and cut it the length of the shower curtain rod. To strengthen the eyelet strip, I sewed another strip of fabric to the back of it. I gathered the whole curtain at the top to the same length as the eyelet strip and sewed them together. Then, I sewed & cut small button holes for the shower curtain rings.
Voila! $1 and I have no idea how many hours of cutting, measuring, and sewing. Maybe 15? Whatever. Totally worth it.

Not too shabby. It turned out all right for a DIY sewing project. If I were to change anything, I would probably have gathered it even more. I'm not sure it's ruffly enough. Wow. I almost sounded girly there for a second...
I'm not sure if I want to keep the wider ruffles. One of these days, I may go crazy (again) and decide to cut the ruffles in half and sew in an additional 10 rows to make it look more like the Urban Outfitters curtain.

Probably not, seeing as how it took me about 6 months to bring this vision to life. Things move rather slowly around here. I'm betting it will probably just stay as is.

I'm still getting used to not having to stare at the cast iron sink inhabiting the Pepto Bismal pink bathtub that is currently hiding back there.

Now, all I have to do is hang some art. Wish me luck!
Also, nagging is recommended for people who don't want to wait another 6 months to hear about this bathroom again. ;)
Yay! I have only been waiting 6 months for a Silence of the Lambs bathroom update! Don't change the curtain - it is fabulously fantastic and perfect like it is. I'm going to get you to show me how you sewed such a wonderful zig-zig stich, because the one time I tried that, it did NOT look good.
ReplyDeleteI LOVE it!!! I agree with MC! DON'T CHANGE A THING!!! I like your version even better than your inspiration images!
ReplyDeleteWhat does Joseph think of all the fluff? :)
OHMYGOSH - this looks SO SO SO good. I think it's perfect and nothing needs changed.
ReplyDeleteSeriously? $1? I'm so amazed right now. You are awesome!
Very impressive! Love it!
ReplyDeleteI love this! PBK has curtains and a dust ruffle like this and I had to force myself not to buy them. Maybe I'll get crafty one day and make some :-) Can you tell it's nap time at our house???
ReplyDeleteWow. Hold the phone. Or the internet connection. It's fantastic. Kim @ The Newlywoodwards featured your project today so I was able to find you :o)
ReplyDeleteI'm totally impressed with your mad skills - you have a new follower.
This is amazing!
ReplyDeleteI am jealous of your pink bathrooms. Google 'Save the Pink Bathrooms' and check it out - they're pretty rare and very coveted! (came here through Kim at the NewlyWoodwards)
ReplyDeleteAlso, awesome job on the shower curtain - if I had some sewing skills I'd totally make one because yeah...I love the ruffles.
This is fantastic! I've been trying to come up with curtains for our spare bedroom that is in the midst of a remodel, and this totally inspired me to make ruffled panels. :) Thanks for the great idea!
ReplyDeleteI love it , I think I would (for my self) I like the double swag look, to cut it in half, and make two panels, then make a valance to match. And using two or three different sheets would be pretty.
ReplyDeleteWow, you did an AMAZING job!!
ReplyDeleteCan you make me one. lol Awesome job!!!
ReplyDelete